With the ever-growing popularity of online banking and money transfer apps, cheques are gradually vanishing as a payment method.
However, occasionally, you may encounter one, as some businesses and individuals prefer to send and receive money through cheques.
A cheque is also a handy document that contains all the details you need to set up direct deposit or pre-authorized payments.
And it’s a great way to send money through the mail if required.
As a result, it’s still worth knowing how to read a Canadian cheque, even if you do all your banking online.
What are the Parts of a Canadian Cheque?
Canadian cheques differ in their format depending on the financial institution that issues them.
But each cheque communicates the same key details about the account holder, their banking information, and the financial transaction it represents.
Here are the main parts of a cheque you need to know:
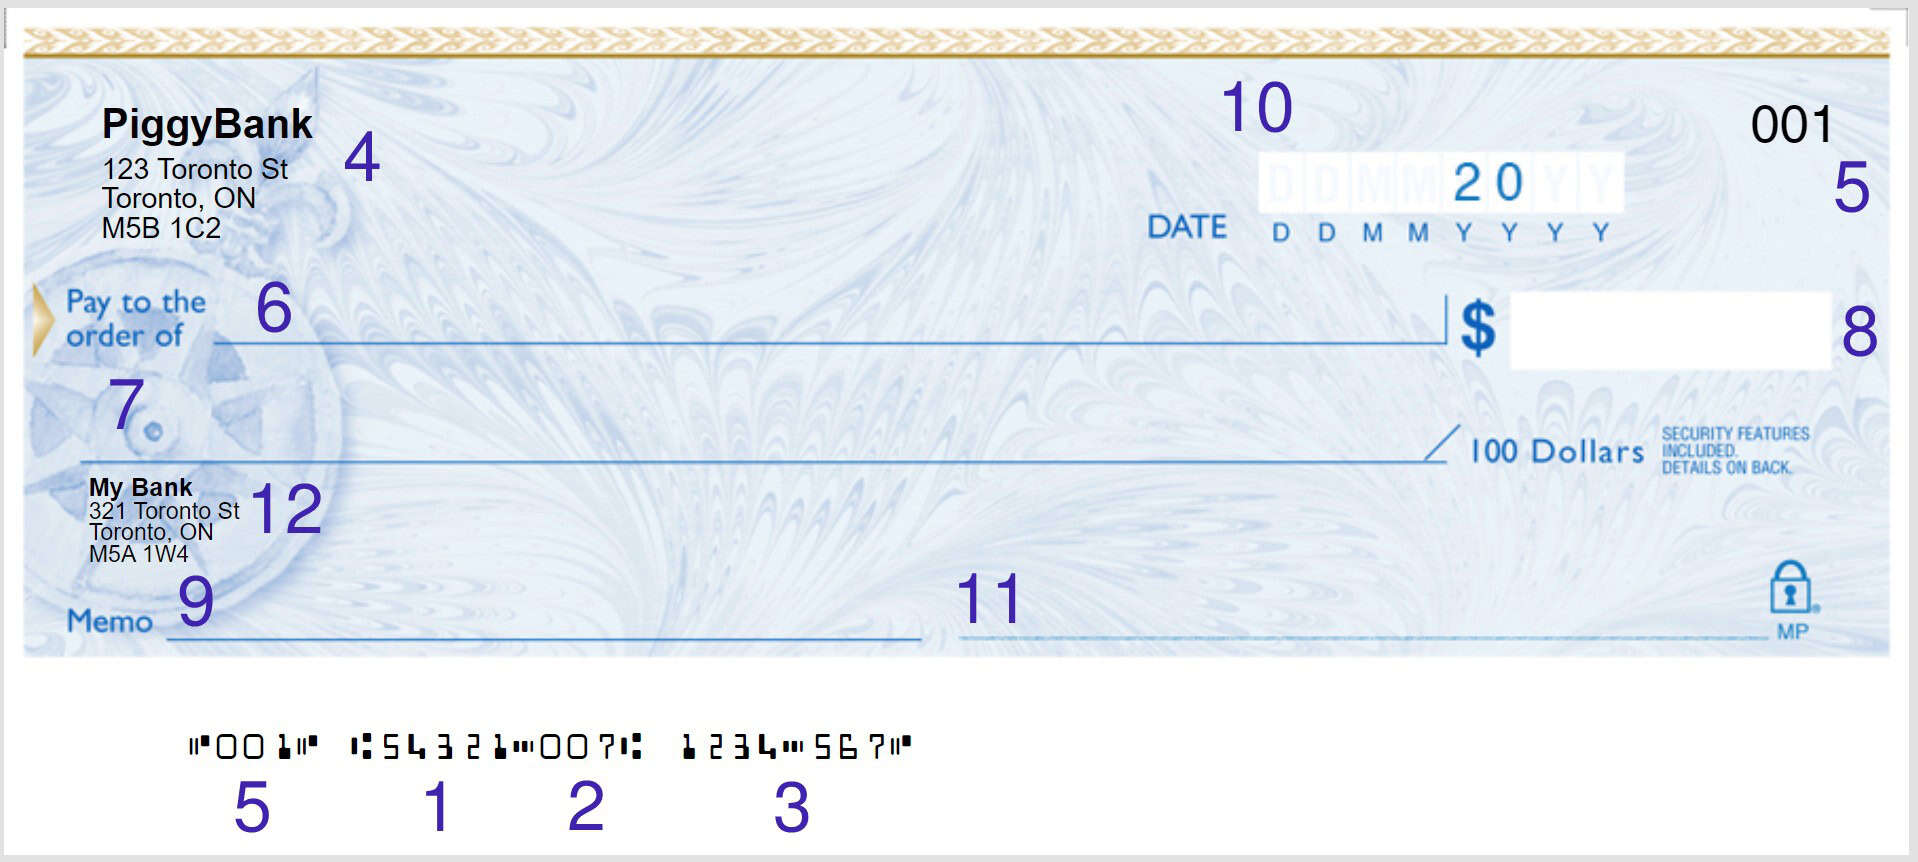
Transit Number (1)
This is a five-digit number that identifies the branch of the banking institution in which you opened your account.
The transit number always remains the same regardless of which branch you use to conduct your financial transactions.
Institution Code (2)
Directly to the right of the transit number is the institution code (sometimes called the designation number).
Each financial institution in Canada is assigned a unique institution code, which always consists of three digits.
While transit numbers differ depending on the individual branch of a bank, the institution code never changes.
Here are the institution numbers for some of Canada’s top banks:
| Bank | Institution code |
|---|---|
| Royal Bank of Canada (RBC) | 003 |
| Toronto-Dominion Canada Trust (TD) | 004 |
| The Bank of Nova Scotia (Scotiabank) | 002 |
| Bank of Montreal (BMO) | 001 |
| Canadian Bank of Commerce (CIBC) | 010 |
| National Bank of Canada (NBC) | 006 |
| HSBC | 016 |
Account Number (3)
The account number identifies the bank account from where money will be withdrawn when the recipient deposits the cheque.
It’s unique to every individual bank account.
In Canada, account numbers range from seven to 12 digits, depending on your financial institution.
Did You Know?
The routing number refers to the combination of the transit number and institution code.
Personal Information (4)
This section of the cheque contains information about the account holder from which the cheque will withdraw funds.
It includes:
- Your full legal name (and the name of the other account holder if the cheque is tied to a joint bank account)
- Your home address
- Your city, province, and postal code
These details will always match those associated with your bank account.
You may also include your phone number and email address on this part of the cheque.
Cheque Number (5)
The cheque number appears in the top right-hand corner and to the left of the transit number.
It’s always three digits in length and is unique to every cheque to facilitate easy transaction verification.
Pay to the Order of (6)
This part contains the name of the person or company for which the cheque is intended.
Only the individual or organization whose name appears in this line can cash the cheque.
It’s important never to leave this field blank; otherwise, anyone who comes across the cheque can deposit it.
Dollar Amount Line (7)
In this area, you write out the payment amount in words.
If you need to include cents in the value, you’ll add this amount as a fraction of 100,
For example, if you’re writing a cheque for $125.75, you’d write “one hundred and twenty-five dollars and 75/100.”
The cents always use numerical values.
Dollar Amount Box (8)
The dollar amount box is located directly to the right of the “pay to the order of” line.
Here, you’d write out the payment amount using entirely numerical values.
Be sure also to include any cents that make up your payment.
If there are no cents, adding a decimal followed by two zeros (e.g., $125.00) is good practice to be clear about the exact payment amount.
Memo (9)
Filling out this part of the cheque isn’t mandatory, but you can use it to specify the reason for payment as it may come in handy for reference in the future.
For example, suppose you’re writing a cheque to a babysitter.
In that case, you can add in the memo line “Payment for babysitting – January 10-2023.”
Date (10)
In the “date” field, you write the date you created the cheque using numerical values.
A cheque is valid from the date noted in this field.
In other words, the recipient can only cash a cheque on or after the cheque date, never before.
A cheque not deposited after six months expires or becomes stale-dated.
Most banks won’t cash a stale-dated cheque unless it’s a certified cheque or a Government of Canada cheque.
Signature Line (11)
A cheque must always contain the signature of the endorser or the individual from whose account the money will be withdrawn.
Otherwise, it’s considered invalid, and the recipient won’t be able to deposit the funds.
Bank Name (12)
The bank name and address represent the financial institution of the person whose funds will be withdrawn when the recipient cashes the cheque.
What are the Differences Between a Canadian and U.S. Cheque?
Canadian and U.S. cheques share layouts and characteristics – it can be tough to distinguish the former from the latter.
However, there are a few key differences between the two.
First, on a Canadian cheque, the routing number (the combination of the transit number and institution code) is eight digits long.
Conversely, American cheques’ routing numbers are nine digits in length.
Second, the cheque number on a Canadian cheque always appears on the far left side of the MICR encoding line (bottom of cheque).
On a U.S. cheque, it’s typically located on the far right-hand side (though it may also appear on the left-hand side).
Third, Canadian cheque numbers have a maximum length of three digits, while U.S. cheque numbers are usually four digits long.